Look no farther if you want to build a comfy dog home on a tight budget! It's considerably easier and less expensive to DIY a dog home out of wooden pallets than to purchase one that has already been created. Continue reading to find out how to make your beloved dog the nicest sleeping space possible. And here some steps how to build dog house with pallets.
How to Build Dog House with Pallets
The pallet dog house's preparation
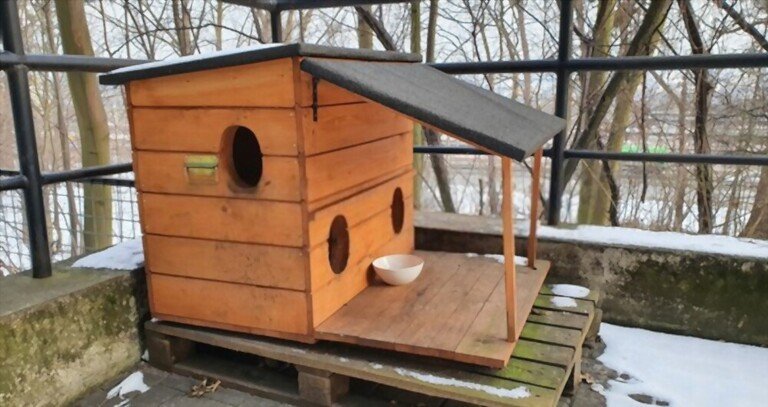
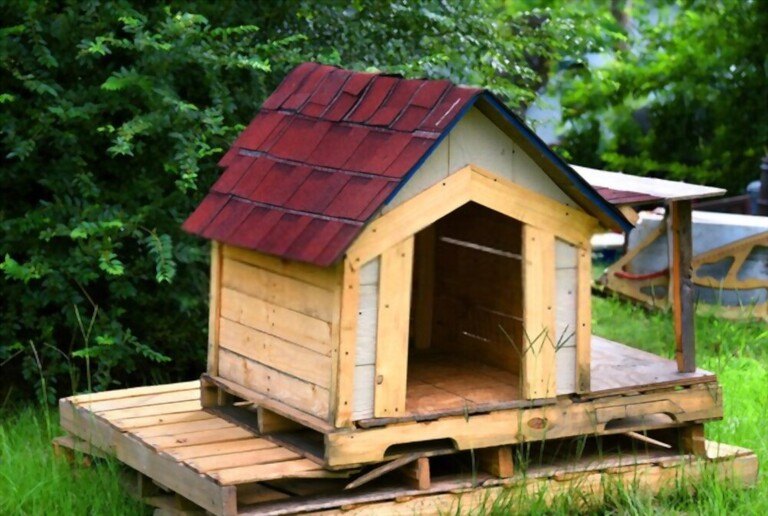
For the dog house, collect 3 stringer pallets. An average-sized doghouse, measuring 40 inches long, 32 inches broad, and 28 inches tall at the top of the slanted roof, will be built as part of this tutorial. This size is suitable for medium- and large-sized puppies. Inquire around at construction sites and pubs, as well as ask around at neighborhood retail businesses to see if they have any extra pallets. For your doghouse, three standard-sized pallets (48 inches) by 40 inches will do.
Only two sides of a pallet that is "stronger" (or alternately, "2-way") are open; the remaining sides are kept together by thicker wooden stringer boards. A "close-boarded" pallet has no openings between the wooden deck boards.
There should be ample room to enter and exit a dog home. Build a home that is 25% taller than your extra-large dog, broad enough for them to lay down, and with 2 inches of room on either side if you have a huge dog.
Locate a shaded area in your yard where you can put the dog home. Shade helps the dog home last longer and keeps your dog cool in the summer. To protect it from the wind, position the dog house as close as you can to a building, such as your home or a garage. On windy days, pay attention to the weather so you can determine which direction the wind often blows from and make sure the dog house's back is facing that way.

To make sure the dog home lies flat, level the ground. The most typical surface for a dog home is dirt; remove weeds with a trowel or shovel and distribute the earth evenly using the back of a rake. Make sure the area is completely grass-free and as level as you can make it. The dog house will have a foundation and will be shielded from hot, cold, or wet ground if you lay down a third pallet.
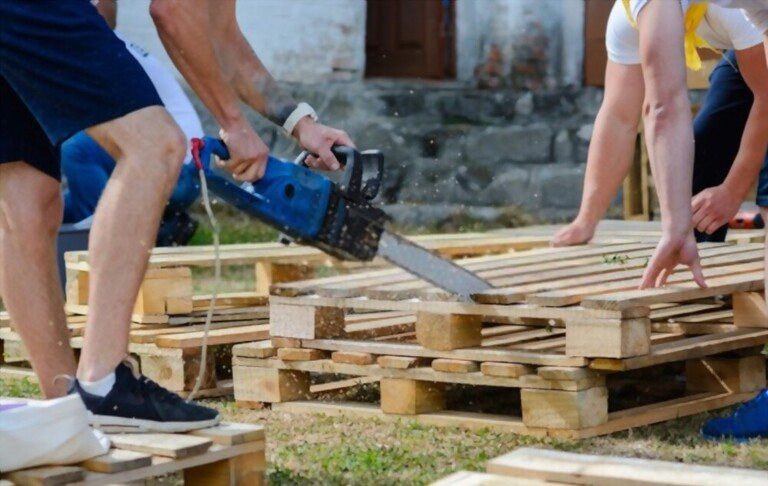
Pallet dismantling and cutting
Two pallets have one side removed, while the third has been completely disassembled. Pry up the nails holding each board in place using a hammer and crowbar. In order to pry the board up, wedge the crowbar's tip between the pallet deck board and. Then, drive the crowbar farther into the gap.
Before gently removing the board from the pallet, keep repeating this on each end and the center of the board. In this manner, you will have 2 pallet sides for the front and back walls, along with a sizable pile of loose pallet planks for the side walls, all of which still have their planks and stringer boards.
To obtain the front and rear walls, split the pallets' unbroken side. Make the front wall eight horizontal panels high and the back wall six horizontal boards high since your pallet boards are approximately 3.5 inches broad. Use a jigsaw or hand saw to cut through the vertical stringers holding the pallet boards together. The front wall will thus be 28 inches tall, while the rear wall will be 21 inches tall.
Cut the pallet-attaching planks to a length of 32 inches apiece. Before making your cuts with a hand saw, measure the right length with a tape measure and write it in pencil on each board. Make sure you have a total of twelve 32 in boards, six for the dog house's two sides.
To make the floor of the home, cut a piece of plywood. Make sure that the measurements of this piece of plywood exactly fit the walls of the dog home. Your dog house's plywood floor will be 40 inches by 32 inches in size so that there are no overhanging edges.
For the home, measure and assemble a plywood roof. Cut the plywood 4 inches longer than the size of the home to shield the interior from rain. Your roof will be one slanting piece of plywood measuring 44 inches by 36 inches because the sides are roughly 40 inches by 32 inches tall.
Putting up the Floor, Ceiling, and Walls
32 inside boards are used to join the front and back walls. By placing your front and back walls upright on their sides and securing a 32-inch board between them, you may construct the first side wall. Use a nail gun or hammer 2 nails into the board's ends to firmly fix it to each wall.
Apply wood glue to the sides of each board as you go to keep them together while you attach the next 5 panels in the same manner. To affix the walls, use 24 1.25 in nails.
Build the other side wall once you have constructed the first one. Until the wall is six horizontal boards high—the same height as the back wall—build it up by hammering and gluing each board individually. The walls ought to be fixed at this point, each one being the same height.
Build the other side wall once you have constructed the first one. Until the wall is six horizontal boards high—the same height as the back wall—build it up by hammering and gluing each board individually. The walls ought to be fixed at this point, each one being the same height.
Use a jigsaw to trace and cut a door into the house's front wall. Make the door fit your dog's size since a door that is too big might let chilly air into the house and make your dog uncomfortable. Draw a doorway that is at least 6 inches wider than your dog and 6 inches taller than the dog's body in pencil using a straight edge. The entrance can then be cut with a jigsaw. Before advance, take a body measurement of your dog so you can determine their size.
The plywood floorboard should be fastened to the house's walls. Before fastening each wall to the floor, spread wood glue around the bottom. Stick the floor and walls together after that, and then begin nailing each home wall from the bottom of the floor sheet. On each corner and in the center of each wall, hammer in a 1 14-inch nail. For this phase, a total of 8 nails are required.
Apply 15 lb tar paper to the roof. Making your roof a little more rain-resistant is the next stage because rain and other inclement weather may harm wood. To prevent rain from seeping into the wood and getting your dog wet, cut a piece of 15 lb tar paper to the same size and secure it to the roof with a staple gun and 375 in galvanized staples.
Furniture, sanding, painting, or staining
The finished house's outside surface has been sanded. Pallet wood is frequently coarse and splinters readily since it is so inexpensive. Make all the sharp edges in the house smooth using a medium-grit sanding block to keep your dog secure and comfortable. To further smooth the pallet wood, sand it again using a fine-grit sanding block after the initial sanding.
If you don't want to, you don't have to totally sand the wood. You just need to sand your dog home once to give it a rustic appearance.
To give the house a polished appearance, paint or stain it. Linseed oil is a non-toxic stain that may be used to complete the house, or you can choose any stain that is eco-friendly and non-toxic to make sure your furry buddy is safe. Make sure you use water-based latex or acrylic paint when painting your dog housing. In the odd event that your dog mistakenly consumes the paint, it won't hurt them.
Your dog home will have a bit more character if the wood has been painted or stained. Choose a product that matches the look you want to achieve! The wood's rustic appearance will be preserved if you decide to dye it. Paint will make the dog house wood seem brand new in the interim.
Conclusion
Follow some steps on how to build a dog house with pallets that are comfortable for your dog by adding extras. Try cushioning the dog house with either wood shavings, straw, or a moisture-proof foam pad because weather may more readily destroy a blanket. This will keep your dog cozy while preventing the attraction of bugs or rain-related destruction. For your dog to drink from while relaxing outside, think about purchasing a weather-resistant water bowl. If you use straw or wood shavings as cushioning, replace them every week.


